
Introduction
Wavy hair is an iconic look that has been popular for decades. From Gisele Bündchen to Cindy Crawford and many others, celebrities have long embraced their natural wave pattern or created it with styling tools. But what exactly is wavy hair? And why do people want to achieve this look?
What is Wavy Hair?
Wavy hair is characterized by its undulating texture, usually in a “S” shape. Unlike curly hair, which forms tighter ringlets, wavy hair has a looser, more relaxed appearance. It can range from barely-there waves to dramatic curls. People with thicker, coarser hair tend to have more pronounced waves.
Why Do People Want to Achieve Wavy Hair?
Wavy hair is a versatile look that can be tailored to any occasion. Whether you’re headed to the office or out for a night on the town, you can easily create a variety of styles with wavy hair. It’s also a great way to add volume and texture to fine, limp hair. Plus, it looks great on all face shapes and hair lengths.

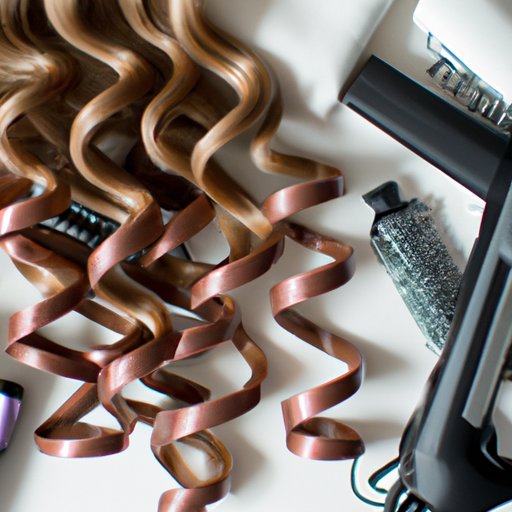
Create Beachy Waves with a Curling Iron
A curling iron is one of the most common tools used to create wavy hair. To get beachy waves, choose a curling iron with a barrel diameter between 1″ and 1.5″. This size will create loose, tousled waves without making them too tight.
Step-by-Step Instructions on How to Curl Hair with a Curling Iron
1. Start with clean, dry hair. Brush through your locks to remove any tangles or knots.
2. Section off your hair. Divide your hair into four sections—two on either side of your head and two in the back. Secure each section with a clip.
3. Heat up your curling iron. Set your curling iron to a medium-high heat setting. Make sure the barrel is fully heated before you start curling.
4. Start at the nape of your neck. Take a small section of hair (about 1″ wide) and wrap it around the barrel of the curling iron. Hold for about 10 seconds and then release.
5. Continue working your way up. Release the first section and take the next section of hair. Wrap it around the barrel and hold for 10 seconds. Repeat until you reach the crown of your head.
6. Switch sides. Unclip the top section of hair and start curling on the other side. Work your way up until you reach the crown.
7. Finish with the front. Take the remaining sections of hair and curl them away from your face. Make sure to leave out some strands for a more natural look.
8. Let your hair cool. Once you’ve finished curling all of your hair, let it cool down for a few minutes. This will help the curls set into place.
9. Spritz with hairspray. Give your hair a light mist of hairspray to keep the waves in place.

Use a Hair Straightener for Loose Wavy Hair
If you prefer a more subtle wave pattern, try using a hair straightener. This method is perfect for those who want to add just a hint of texture to their hair. To achieve this look, choose a flat iron with ½” plates.
Step-by-Step Instructions on How to Achieve Wavy Hair with a Hair Straightener
1. Start with slightly damp hair. Towel-dry your hair until it’s just slightly damp. Don’t apply any product yet.
2. Section off your hair. Divide your hair into four sections—two on either side of your head and two in the back. Secure each section with a clip.
3. Heat up your flat iron. Set your flat iron to a low heat setting. Make sure the plates are fully heated before you start curling.
4. Start at the nape of your neck. Take a small section of hair (about 1″ wide) and clamp the flat iron at the root. Twist the flat iron away from your face and slide it down the length of your hair.
5. Continue working your way up. Release the first section and take the next section of hair. Clamp the flat iron at the root and twist away from your face. Repeat until you reach the crown of your head.
6. Switch sides. Unclip the top section of hair and start curling on the other side. Work your way up until you reach the crown.
7. Finish with the front. Take the remaining sections of hair and curl them away from your face. Make sure to leave out some strands for a more natural look.
8. Spritz with hairspray. Give your hair a light mist of hairspray to keep the waves in place.
Achieve Soft Waves with Flexi Rods
Flexi rods are a great way to achieve soft, loose waves. They come in a variety of sizes, so you can customize the look to fit your preference. For a beachy wave pattern, opt for smaller rods (0.5″ to 0.75″).
Step-by-Step Instructions on How to Achieve Soft Waves with Flexi Rods
1. Start with clean, damp hair. Wash your hair and towel-dry until it’s slightly damp. Apply a leave-in conditioner or curl cream to help protect your hair from heat damage.
2. Section off your hair. Divide your hair into four sections—two on either side of your head and two in the back. Secure each section with a clip.
3. Start at the nape of your neck. Take a small section of hair (about 1″ wide) and wrap it around the rod. Secure the rod with a clip. Repeat until you reach the crown of your head.
4. Switch sides. Unclip the top section of hair and start curling on the other side. Work your way up until you reach the crown.
5. Finish with the front. Take the remaining sections of hair and curl them away from your face. Make sure to leave out some strands for a more natural look.
6. Let your hair dry. Allow your hair to air-dry completely before removing the flexi rods. If you need to speed up the process, use a blow dryer on the cool setting.
7. Spritz with hairspray. Give your hair a light mist of hairspray to keep the waves in place.
Try Twisting and Pinning for Natural-Looking Waves
Twisting and pinning is a great way to create natural-looking waves. This method works best on medium to long hair, as shorter hair may not have enough length to stay in place.
Step-by-Step Instructions on How to Twist and Pin Hair for Natural-Looking Waves
1. Start with clean, damp hair. Wash your hair and towel-dry until it’s slightly damp. Apply a leave-in conditioner or curl cream to help protect your hair from heat damage.
2. Section off your hair. Divide your hair into four sections—two on either side of your head and two in the back. Secure each section with a clip.
3. Start at the nape of your neck. Take a small section of hair (about 1″ wide) and twist it away from your face. Secure the twist with a bobby pin. Repeat until you reach the crown of your head.
4. Switch sides. Unclip the top section of hair and start twisting on the other side. Work your way up until you reach the crown.
5. Finish with the front. Take the remaining sections of hair and twist them away from your face. Make sure to leave out some strands for a more natural look.
6. Let your hair dry. Allow your hair to air-dry completely before removing the pins. If you need to speed up the process, use a blow dryer on the cool setting.
7. Spritz with hairspray. Give your hair a light mist of hairspray to keep the waves in place.
Embrace the Sea Salt Spray Look
Sea salt spray is a great option for those who want to embrace their natural wave pattern. It adds texture and volume to your hair while enhancing your existing wave pattern. To get the best results, choose a sea salt spray with a light to medium hold.
Step-by-Step Instructions on How to Achieve Sea Salt Spray Look
1. Start with clean, damp hair. Wash your hair and towel-dry until it’s slightly damp.
2. Spritz with sea salt spray. Holding the bottle 8-10 inches away from your head, spray your hair with the sea salt spray. Make sure to cover every strand of hair.
3. Scrunch your hair. Use your hands to scrunch your hair and enhance the wave pattern.
4. Let your hair air dry. Allow your hair to air-dry completely before styling.
5. Spritz with hairspray. Give your hair a light mist of hairspray to keep the waves in place.

Get the Perfect Wavy Bob with Hot Rollers
Hot rollers are a great way to get the perfect wavy bob. Choose rollers with a 1″ diameter for a subtle wave pattern, or larger rollers for a more dramatic look.
Step-by-Step Instructions on How to Get the Perfect Wavy Bob with Hot Rollers
1. Start with clean, damp hair. Wash your hair and towel-dry until it’s slightly damp. Apply a leave-in conditioner or curl cream to help protect your hair from heat damage.
2. Heat up the hot rollers. Plug in the hot rollers and allow them to heat up.
3. Section off your hair. Divide your hair into four sections—two on either side of your head and two in the back. Secure each section with a clip.
4. Start at the nape of your neck. Take a small section of hair (about 1″ wide) and wrap it around the roller. Secure the roller with a clip. Repeat until you reach the crown of your head.
5. Switch sides. Unclip the top section of hair and start rolling on the other side. Work your way up until you reach the crown.
6. Finish with the front. Take the remaining sections of hair and roll them away from your face. Make sure to leave out some strands for a more natural look.
7. Let your hair cool. Once you’ve finished rolling all of your hair, let it cool down for a few minutes. This will help the curls set into place.
8. Remove the rollers. Carefully remove the rollers from your hair. Don’t tug too hard or you may disrupt the wave pattern.
9. Spritz with hairspray. Give your hair a light mist of hairspray to keep the waves in place.
Conclusion
Creating wavy hair is easier than you think! With the right tools and techniques, you can achieve a variety of looks—from beachy waves to loose waves and everything in between. Just remember to use a heat protectant spray to keep your hair healthy and hydrated. Once you’ve perfected your wavy hairstyle, use a hairspray to keep it in place all day long.